1. Introduction
Much of what is known about actin and microtubule dynamics comes from cells spread on glass. The behaviour of the same filaments inside an intact epithelium, where cells are joined to neighbours, rest on a basement membrane and are stretched by the growth of the animal, can be quite different. The zebrafish offers an unusually direct way to observe it. The embryo is transparent, develops outside the mother, and is covered from the first day by an epidermis only two cells thick. A high numerical aperture objective can therefore be brought to within its working distance of the cells of interest without any dissection.
The convenience is deceptive. A time-lapse recording of a living epithelium is an experiment in which the observer adds a fluorescent protein that binds the structure under study, immobilises and anaesthetises the animal, and then delivers light for minutes or hours. Each intervention can alter the cytoskeleton. Probes for actin differ in which filament populations they label and can perturb them when expressed strongly (Belin et al., 2014). Stiff mounting media restrict growth (Kaufmann et al., 2012). Illumination causes damage well before any bleaching is seen (Icha et al., 2017).
This article proposes a protocol for live imaging of cytoskeletal dynamics in the embryonic and larval zebrafish epidermis that addresses these hazards in sequence. It is written for laboratories with access to a spinning disk or point-scanning confocal microscope and a standard fish facility. The protocol is a synthesis of published methods and recommendations. It has not been tested as a whole here, and no results are reported.
2. Background
Two bodies of knowledge inform the design: the structure of the tissue, and the properties of the reporters available for it.
2.1. The epidermis as a target
During embryonic and larval stages the zebrafish epidermis consists of an outer layer, the periderm, and an inner basal layer attached to the basement membrane; it becomes stratified only at metamorphosis (Le Guellec et al., 2004). The two layers differ in origin and in cytoskeletal organisation. Periderm cells carry on their free surface a labyrinth of actin-based protrusions called microridges, which have been imaged in living animals and shown to form from smaller precursors under the control of cortical contraction (Lam et al., 2015; van Loon et al., 2020). Basal cells lack microridges and face the basement membrane, to which they are anchored. A protocol must therefore specify which layer is being imaged, since the same reporter expressed in both would give superimposed signals a few micrometres apart.
2.2. Reporters for actin and microtubules
Three kinds of genetically encoded probe are in common use for filamentous actin. Lifeact is a short peptide of 17 amino acids derived from a yeast actin-binding protein and fused to a fluorescent protein (Riedl et al., 2008). A second probe uses the calponin homology domain of utrophin (Burkel et al., 2007). The third is fluorescently tagged actin itself. They are not interchangeable: a systematic comparison found that each is enriched on some filament networks and under-represented on others, and that high expression can change network architecture (Belin et al., 2014). For microtubules, a tagged tubulin shows the whole array, whereas a tagged end-binding protein such as EB3 marks only growing plus ends and allows polymerisation to be followed as moving comets (Stepanova et al., 2003).
3. The Proposed Protocol
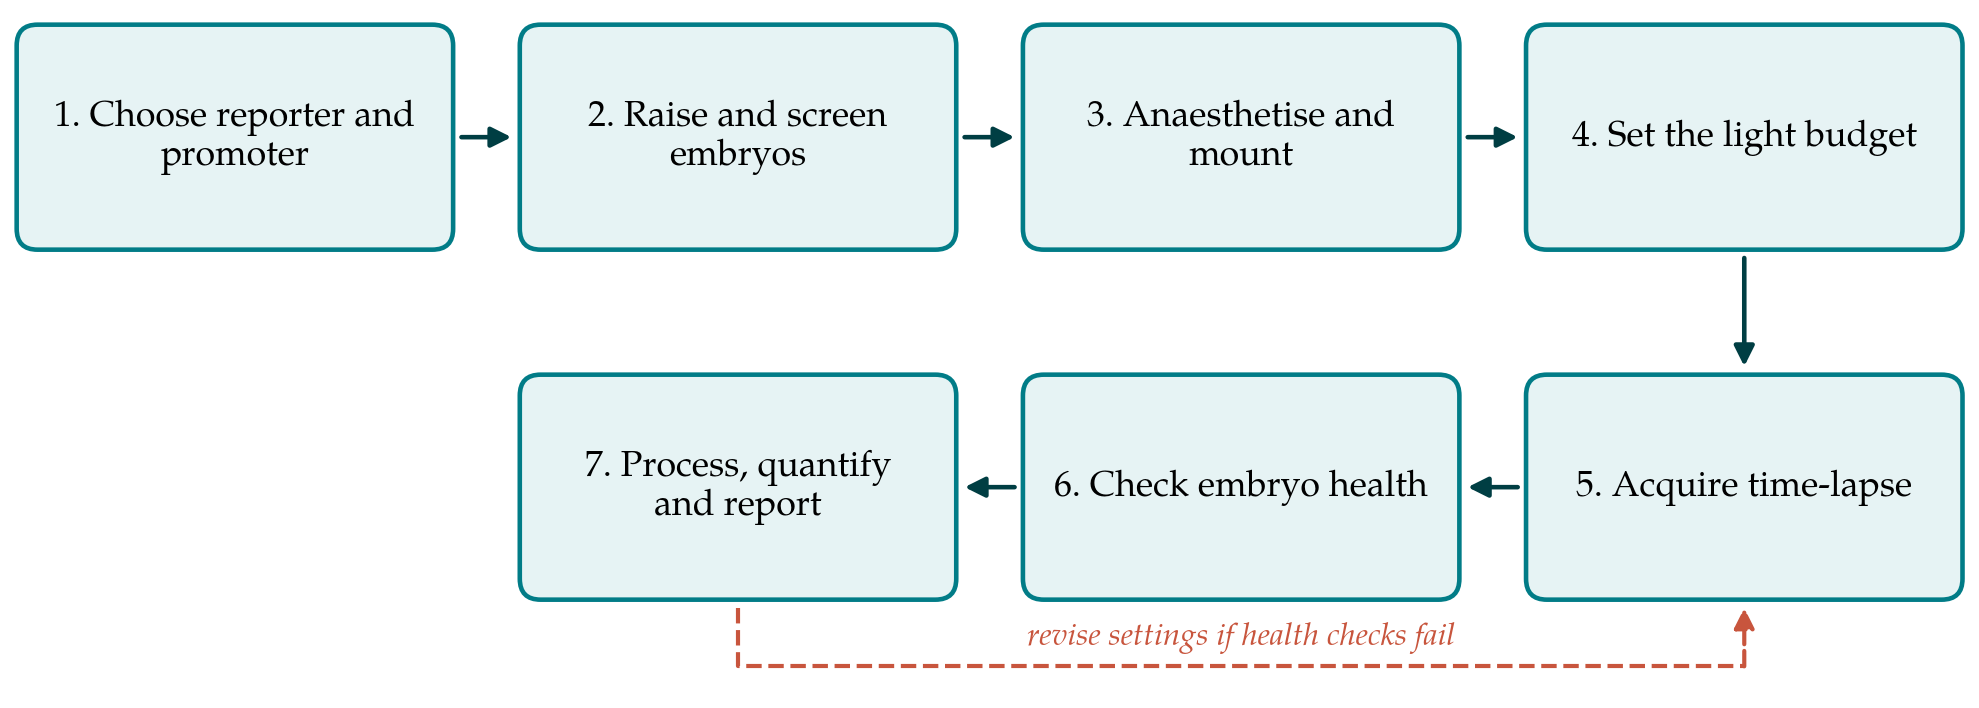
The protocol has seven steps, shown as a sequence in Figure 1. Table 1 lists, for each step, the choice recommended and the artefact it is meant to prevent. The steps are then described in order, with the reasoning that a laboratory would need in order to depart from the recommendation safely.
| Step | Recommended choice | Artefact guarded against |
|---|---|---|
| 1. Reporter and promoter | Layer-specific keratin promoter; low expression; confirm with a second probe | Probe-induced changes to filaments; mixed layers |
| 2. Raising and screening | Stage by morphology; brief low-power screening | Stage mismatch; early light exposure |
| 3. Mounting | Lowest agarose concentration that holds the animal; tricaine in medium | Restricted growth; movement; compression |
| 4. Light budget | Fix total dose in advance; long wavelength; sensitive detector | Phototoxic change in dynamics |
| 5. Acquisition | Interval matched to the process; shallow stacks | Under-sampling; needless exposure |
| 6. Health checks | Heartbeat, circulation and cell divisions; unimaged siblings | Recording of a dying tissue |
| 7. Processing and reporting | Scripted analysis on raw data; full settings reported | Irreproducible quantification |
3.1. Step 1: Choose the reporter and promoter
The reporter should be chosen for the question. For the overall shape of cortical actin and microridges, Lifeact or the utrophin domain is suitable; for turnover within a structure, tagged actin is more appropriate. Whatever the choice, the protocol recommends that a key observation be repeated with a second, unrelated probe before it is interpreted. Expression should be restricted to one layer by a keratin promoter. The promoter characterised by Gong et al. (2002) drives expression in the superficial layer, and promoter fragments specific for basal cells have also been described. Constructs are conveniently assembled with the Tol2kit, which combines a promoter, a coding sequence and a polyadenylation signal in a transposon backbone (Kwan et al., 2007).
Two modes of expression are useful. Injection of the construct with transposase messenger RNA at the one-cell stage gives mosaic animals in which isolated labelled cells sit among unlabelled neighbours, so that cell outlines and protrusions can be resolved. A stable transgenic line gives uniform labelling for measurements across the tissue. For either, the dimmest animals in which the structure can still be seen should be selected, because the brightest are the most likely to be perturbed.
3.2. Step 2: Raise and screen embryos
Embryos are raised at the standard temperature of 28.5 °C and staged by morphology and not by hours alone (Kimmel et al., 1995). If imaging will extend beyond the onset of pigmentation, melanin can be suppressed with phenylthiourea (Karlsson et al., 2001), although epidermal imaging is often possible between melanophores and the drug is best avoided when it is not needed. Unhatched embryos are dechorionated with fine forceps shortly before mounting. Screening for fluorescence should be done quickly on a stereomicroscope at low power, since exposure during screening counts against the light budget described in Step 4.
3.3. Step 3: Anaesthetise and mount
Animals are anaesthetised with buffered tricaine at the concentration given in standard husbandry references (Westerfield, 2000) and embedded in low-melting-point agarose on a glass-bottomed dish, with the region to be imaged against the glass. The agarose should be cooled to just above its gelling point before the animal is added. The lowest concentration that prevents drift should be used, because embryos held in stiff agarose grow abnormally over long recordings, a problem documented for light sheet microscopy and equally relevant here (Kaufmann et al., 2012). Once the gel has set it is covered with embryo medium containing tricaine. The specimen should not be pressed against the glass. The periderm is the outermost cell layer of the animal, and compression flattens microridges and can wound it.
3.4. Step 4: Set the light budget
Phototoxicity is the main threat to a recording of cytoskeletal dynamics, since its early signs are subtle changes in exactly the rates being measured. The protocol therefore asks the user to decide the total light dose before the experiment and to treat it as a fixed budget to be divided among time points and focal planes. The recommendations of Icha et al. (2017) and Laissue et al. (2017) are followed: use the longest excitation wavelength for which a suitable fluorescent protein is available, prefer a camera-based spinning disk or a light sheet system to a point scanner where there is a choice, lower laser power and lengthen exposure instead of the reverse, and stop illumination between frames. The power at the objective should be measured with a meter and recorded, since a percentage setting in the software means nothing to another laboratory.
3.5. Step 5: Acquire the time-lapse
The interval between frames should be set by the process. Plus-end comets and actin flow require intervals of seconds over a few minutes; the remodelling of microridges or the rearrangement of cells requires intervals of minutes over hours. Sampling faster than the process demands spends the budget for no gain. Because the epidermis is thin, a stack of a few planes spanning one layer is sufficient, and a single plane is often enough for a flat region over the yolk or the trunk. Focus drift is better corrected by a hardware autofocus or by acquiring a slightly larger stack than by re-imaging. The stage should be held at the rearing temperature throughout.
3.6. Step 6: Check the health of the specimen
A recording should be accepted only if the animal was demonstrably healthy at its end. The protocol specifies three checks. Heartbeat and circulation are inspected by transmitted light before and after the session. The imaged field is examined for signs of damage, such as cell rounding, blebbing or extrusion of cells from the periderm. Where the recording is long enough, the occurrence of normal cell divisions in the field is noted, since mitotic delay is a sensitive indicator of light damage (Laissue et al., 2017). Siblings mounted in the same dish and not illuminated serve as controls for the effects of mounting and anaesthesia alone. If any check fails, the light budget is reduced and the experiment repeated, which is the return loop in Figure 1.
3.7. Step 7: Process, quantify and report
Raw files are kept unaltered, and all processing is carried out by script on copies so that it can be repeated. Fiji provides the necessary tools for registration, kymograph construction and segmentation (Schindelin et al., 2012), and TrackMate can follow plus-end comets or other discrete objects (Tinevez et al., 2017). Measurements should be summarised per animal before any statistical comparison, because cells within one animal are not independent. The methods section of any resulting paper should give the transgene and its mode of expression, stage, mounting medium and anaesthetic, objective, measured power, exposure, interval and duration, together with the animal details required by the ARRIVE guidelines (Percie du Sert et al., 2020).
4. Adapting the Protocol
The protocol is written for a confocal microscope, and two adaptations are foreseeable. Laboratories with a light sheet instrument can mount animals in a tube of fluorinated polymer, whose refractive index is close to that of water, with very dilute agarose, as Kaufmann et al. (2012) describe, and gain a large reduction in light dose at some cost in resolution at the surface. Laboratories working at later larval stages will find that scales, pigment and a thicker epidermis change the optics, and that anaesthesia over many hours becomes the limiting factor. In both cases Steps 4 and 6 apply unchanged. All work must be covered by the relevant institutional and national approvals for the use of fish, which differ between jurisdictions in the stage from which larvae are regulated.
5. Limitations and What Remains to Be Shown
The protocol is proposed and not validated. Its individual recommendations rest on published evidence, and their combination has not been compared here with any alternative. Three comparisons would establish whether the word optimised is deserved in the stronger sense. The first is between reporters: whether measurements such as microridge length or comet velocity agree when made with two unrelated probes at low expression. The second is between light doses: whether the measured dynamics are stable across a range of doses below the chosen budget, which is the only direct test that the budget is safe. The third is between mounting conditions over long recordings. Each is a modest experiment, and each would need to be repeated when the stage, the layer or the microscope changes.
Some limits are inherent. Any fluorescent reporter reports its own distribution, which is not identical to that of the endogenous protein. Anaesthesia with tricaine and immobilisation in a gel are departures from normal physiology that cannot be removed, only held constant. The protocol reduces known sources of artefact and does not guarantee their absence.
6. Conclusion
The zebrafish epidermis allows cytoskeletal dynamics to be recorded in an intact vertebrate epithelium with ordinary equipment. The protocol proposed here orders the practical decisions into seven steps and attaches to each the artefact it is meant to prevent, with an explicit light budget and specimen health checks at its centre. It is offered as a starting point for laboratories to test, adapt and report against, and its performance relative to existing practice remains to be demonstrated.
Conflict of interest
To be declared by the author(s) before publication.
Funding
To be declared by the author(s) before publication.