1. Introduction
Few small regions carry as much clinical weight as the front of the upper thigh. A doctor feels for the femoral pulse in a collapsed patient, punctures the femoral artery for angiography by the technique that Seldinger (1953) introduced, places a line in the femoral vein, blocks the femoral nerve for a fractured hip and works out whether a lump in the groin is a hernia, a node or a varix. All of this takes place within the femoral triangle, and all of it is done from the surface.
Teaching, by contrast, tends to start from the inside. Students learn the boundaries and contents from a prosection or an atlas plate, memorise the order of nerve, artery and vein, and are examined on a labelled drawing. What they are seldom asked to do is to find the same structures through the skin of a living person, where nothing is labelled and people differ. Ultrasound has entered many curricula as a way of bridging that gap (Hoppmann et al., 2011; Bahner et al., 2014), and drawing on the body surface has been used for the same purpose (McMenamin, 2008).
This article proposes a way of combining the two for one region. It sets out a procedure in which students predict the surface anatomy of the femoral triangle, check the prediction with ultrasound and leave the session with a map drawn on the limb. The procedure has not been trialled for this article; what follows is a design, with the reasoning behind each step.
2. Background
The anatomy itself is not in dispute. The triangle is bounded above by the inguinal ligament, laterally by the medial border of sartorius and medially by the medial border of adductor longus. Its floor is formed by iliopsoas and pectineus, and its roof by the fascia lata. From lateral to medial it contains the femoral nerve, the femoral artery, the femoral vein and the femoral canal with its lymphatics, the last three enclosed in the femoral sheath and the nerve lying outside it beneath the iliac fascia. The artery enters at the mid-inguinal point, halfway between the anterior superior iliac spine and the pubic symphysis (Standring, 2016; Moore et al., 2018).
Two teaching traditions bear on the proposal. The first is living anatomy: palpation, surface marking and body painting on peers or models. McLachlan et al. (2004) described a medical course that taught anatomy entirely through living and imaged bodies, and qualitative work has found that students regard painting as memorable and engaging while raising questions of modesty that teachers must plan for (Finn and McLachlan, 2010). The second is ultrasound. Since the first reports of its use in anatomy courses (Tshibwabwa and Groves, 2005), hand-held and cart-based machines have been brought into dissecting rooms and tutorials in many schools, students have generally welcomed them (Brown et al., 2012; Swamy and Searle, 2012), and a national curriculum for medical students has been published in the United States (Baltarowich et al., 2014). The wider clinical case for point-of-care ultrasound was set out by Moore and Copel (2011).
Evidence on learning is more mixed than on enjoyment. A comparison of ultrasound with cadaveric prosection for teaching the heart found the two broadly equivalent (Griksaitis et al., 2012), and a review of ultrasound in medical student education concluded that satisfaction is consistently high while gains in anatomical knowledge are less consistently shown (So et al., 2017). One reasonable reading is that a grey-scale image is itself hard to interpret, so that ultrasound adds a task as well as an aid. The procedure below tries to deal with that by giving the image a single job: to confirm or correct a line the student has already drawn.
3. Equipment, Setting and Safeguards
The session needs a couch with screens, an ultrasound machine with a high-frequency linear transducer for each group of four to six students, gel, wipes, and skin-safe markers in at least three colours. A hand-held device connected to a tablet is sufficient. One tutor with basic scanning competence can supervise two or three groups if a short demonstration is given first.
The region is the groin, and safeguards matter more here than for the forearm or the neck. Being examined must be entirely voluntary, with no record of who declined. Models wear shorts rolled up on one side so that only the upper thigh is exposed, groups may be single-sex if students prefer, and a paid model or a simulated patient is the better choice where peer examination is culturally difficult. Students are told beforehand that the scan is not diagnostic, and the school should have a written route for the rare occasion when something unexpected, such as an enlarged node, is seen. Diagnostic ultrasound at standard settings is regarded as safe, and scanning is nonetheless kept as brief as the task allows.
4. The Proposed Procedure
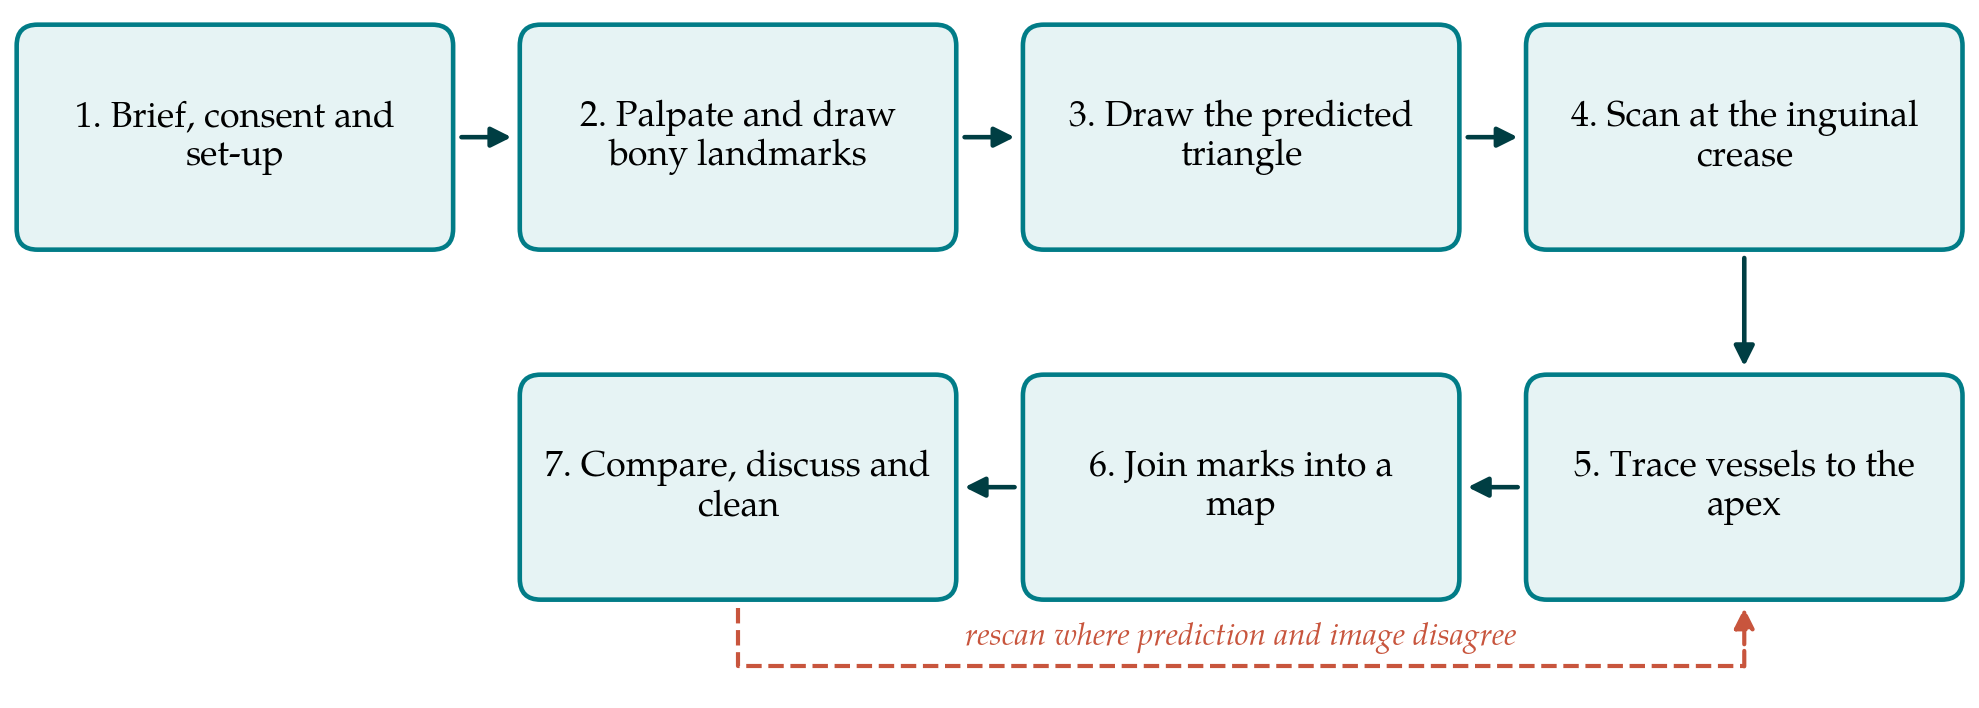
The exercise has seven steps and is planned for about fifty minutes. Figure 1 shows the sequence. Students rotate through the roles of model, marker, scanner and scribe if numbers and consent allow.
4.1. Step 1: Brief, consent and set-up
The tutor states the aim, repeats that participation as a model is optional and demonstrates probe handling: light pressure, the transducer at right angles to the skin, and the orientation marker towards the model's right. The model lies supine with the hip slightly abducted and externally rotated, which opens the triangle and relaxes the fascia.
4.2. Step 2: Palpate and draw the bony landmarks
The marker finds the anterior superior iliac spine and the pubic tubercle by palpation, with the model's own hand guiding where that is more comfortable, and joins them with a line for the inguinal ligament. The pubic symphysis is marked in the midline. Students often place the ligament too low, along the skin crease, and the tutor should let the error stand until the scan.
4.3. Step 3: Draw the predicted triangle
Sartorius is made to stand out by asking the model to flex, abduct and laterally rotate the hip against light resistance, and its medial border is drawn. Adductor longus is found as the cord-like tendon below the pubic tubercle on resisted adduction, and its medial border is drawn to meet sartorius at the apex. In one colour, the group then draws where it expects the artery to lie, starting at the mid-inguinal point, with the vein medial to it and the nerve lateral.
4.4. Step 4: Scan at the inguinal crease
The scanner places the transducer transversely just below the drawn ligament. The femoral artery appears as a round, pulsating, dark circle that keeps its shape under pressure; the vein lies medial to it and flattens when the probe is pressed down, the standard way of telling the two apart (Troianos et al., 2011). Colour Doppler, if fitted, confirms flow. Lateral to the artery and slightly deeper, beneath a bright fascial line, the femoral nerve is seen as a flattened, brighter, speckled structure lying on iliopsoas. Table 1 lists the appearances students should be shown. With each structure centred on the screen, the marker puts a dot on the skin at the midpoint of the transducer in a second colour.
| Structure | Appearance on a transverse scan | Surface mark | Clinical link |
|---|---|---|---|
| Femoral artery | Round, dark, pulsatile, not compressible | Line from mid-inguinal point | Pulse; arterial puncture |
| Femoral vein | Dark, medial to artery, collapses on pressure | Line medial to artery | Central venous access |
| Femoral nerve | Bright, flattened, lateral and deep to fascia | Line lateral to artery | Femoral nerve block |
| Great saphenous vein | Superficial vein arching into femoral vein | Dot at the junction | Varicose veins; saphena varix |
| Deep femoral artery | Second artery arising posterolaterally | Dot at the bifurcation | Level for safe puncture |
| Sartorius and adductor longus | Muscle bellies with bright fascial borders | Borders of the triangle | Apex and adductor canal |
4.5. Step 5: Trace the vessels to the apex
The transducer is slid down the thigh a finger-breadth at a time. A little below the ligament the great saphenous vein is seen curving through the fascia to join the femoral vein, and its junction is marked. Further down the artery divides and the deep femoral artery passes backwards and laterally; that level is marked too. Dots are added over artery and vein at each station until sartorius is seen to slide across in front of the vessels, which is the apex of the triangle and the entrance to the adductor canal.
4.6. Step 6: Join the marks into a map
Gel is wiped away and the dots are joined: a line for the artery, one for the vein, one for the nerve in the upper part of the triangle, and symbols for the saphenous junction and the arterial bifurcation. The limb now carries two drawings in different colours, the prediction and the ultrasound map.
4.7. Step 7: Compare, discuss and clean
The group compares the drawings and explains each discrepancy. The usual ones are instructive: the ligament drawn at the crease, the artery placed at the midpoint of the ligament instead of the mid-inguinal point, and the vein drawn beside the artery all the way down when it in fact comes to lie behind it. The tutor then ties the map to practice by asking where a pulse would be felt, where a needle for the vein would enter and why a femoral hernia appears medial to the vein. The map may be photographed only with the model's consent and without identifying features. Skin and transducer are cleaned.
5. Fitting the Exercise to a Curriculum
The session is meant to follow, not replace, the students' first encounter with the region in the dissecting room or on prosections, so that the image is read against a known three-dimensional arrangement. Where cadaveric teaching is limited it can stand alongside models and atlases. Schools with few machines can run it as one station in a rotating practical, and schools with none can still use steps 1 to 3 and 7 as a surface anatomy class. Later in the course, the same map is a natural starting point for simulated venous access on a phantom.
Tutor preparation deserves a line in the timetable. Anatomists who do not scan routinely need a short training session of their own, ideally led by a radiologist, sonographer or emergency physician, in which they practise the same seven steps on one another. A one-page guide with labelled reference images of the transverse view at the crease, the saphenous junction and the arterial bifurcation helps both tutors and students, and the clinical colleague who helps to write it is often willing to teach on the day.
Evaluation should be planned with the teaching. The four levels described by Kirkpatrick and Kirkpatrick (2006) give a convenient frame: reaction can be gauged by questionnaire, learning by a surface-marking test on an unfamiliar model some weeks later, and behaviour by performance in later clinical skills teaching. Because operating the machine and reading the image add mental effort of their own, a simple rating of perceived difficulty is worth collecting at the same time, so that a disappointing result can be traced to the method or to the equipment.
6. Limitations and What Remains to Be Shown
The procedure is proposed and has not been validated here. Its central assumption, that predicting before scanning improves retention of surface anatomy compared with scanning alone or drawing alone, is untested and would need a comparative study with a delayed outcome. It is equally possible that the benefit, if any, comes from time on task and would be matched by a longer conventional class.
Practical limits are easier to foresee. Image quality falls with increasing depth of subcutaneous tissue, and the nerve in particular can be hard for novices to see. Surface marks shift with the skin, so the map is accurate only in the position in which it was drawn. Some students will not wish to be models and some settings will not permit peer examination of the groin at all. Tutors need enough scanning skill to rescue a poor image, which has a cost in staff training. None of these rules the exercise out, but each should be reported honestly by anyone who pilots it.
7. Conclusion
Surface marking shows students what they believe about a region, and ultrasound shows them what is there. Putting the two in sequence, on a region as clinically important as the femoral triangle, turns the scan into a test of the student's own drawing. The seven-step exercise described here needs modest equipment and under an hour. Whether it teaches the surface anatomy of the groin better than existing methods is a question for a properly designed trial, and the procedure is offered so that such a trial can be run.
Conflict of interest
To be declared by the author(s) before publication.
Funding
To be declared by the author(s) before publication.