1. Introduction
When a garment is cut in the usual way, its pattern pieces are drawn first and arranged on the cloth afterwards. Whatever lies between the pieces is swept from the cutting table. The share lost in this way is commonly put at around fifteen per cent of the fabric used in cut-and-sew garment production (Rissanen and McQuillan, 2016), and the textile industry as a whole has been criticised for the volume of material that leaves it as waste before a product is ever sold (Ellen MacArthur Foundation, 2017; Niinimäki et al., 2020). Recycling the offcuts recovers part of the fibre. It does not recover the water, energy, dye and labour already spent on turning that fibre into finished cloth.
Zero-waste pattern cutting takes a different route. The designer treats the full width and a chosen length of the cloth as the working space and shapes the garment so that every part of that rectangle is used. The practice has a long history in dress cut from loom-width lengths (Burnham, 1973) and a growing contemporary literature. Most of the published garments, however, are dresses, shirts, trousers and unstructured coats. Tailored outerwear has been treated far less often, and for good reason: it is the category in which the conventional pattern is most closely tied to the body and to a sequence of inner construction that leaves little freedom to move a seam line.
This article proposes a procedure for developing a zero-waste or near zero-waste pattern for a woman's tailored coat and for judging the result against a conventionally cut coat of the same style. It is a method paper. No garments were cut for it and no utilisation figures are reported; the procedure is offered for others to apply and to test.
2. Background
Three bodies of work inform the design of the procedure: the craft literature on how a tailored coat is cut and made, the design research on zero-waste practice, and the operational research on cutting and nesting.
2.1. Where the waste arises in a tailored coat
A classic coat block produces pieces that nest badly. The front carries a curved armhole, a shaped neck and a lapel that extends beyond the centre front. The two-piece sleeve has a high, rounded crown. The under collar is cut on the bias in two halves, the top collar on the straight grain, and both are small, curved shapes that sit awkwardly beside long panels (Aldrich, 2015). Facings, pocket flaps, welts and vents add further small parts. Woollen coatings then impose rules of their own. A napped or brushed surface must be cut with every piece running the same way, checks must be matched at seams, and wide inlays are left for alteration, so the marker maker cannot turn or interlock pieces freely (Cabrera and Meyers, 1984). A lining and several interlinings are cut separately, each with a marker and waste of its own.
2.2. Zero-waste approaches in the design literature
Rissanen (2013) gave the first extended account of zero-waste fashion design as a practice in which pattern cutting is a design activity and not a technical service performed after the sketch. Later writing has described the working methods in more detail: planning from the fabric width, letting the negative space of one piece become another piece, and accepting that the garment's final appearance is discovered through the pattern (Townsend and Mills, 2013; Carrico and Kim, 2014; Rissanen and McQuillan, 2016). Saeidi and Wimberley (2018) combined flat cutting with draping. McQuillan (2020) extended the idea to the weaving stage, where garment and cloth are designed as one textile form. Across this work the recurring difficulties are fit, grading across sizes and acceptance by industry (Gwilt and Rissanen, 2011; Ramkalaon and Sayem, 2021).
2.3. How utilisation is measured
Cutting rooms express economy as marker efficiency: the area of the pattern pieces divided by the area of the marker, which is the usable fabric width multiplied by the marker length (Cooklin, 2006). Arranging irregular shapes to raise that ratio is a nesting problem in the typology of Wäscher et al. (2007), and the geometric tools used to solve it are reviewed by Bennell and Oliveira (2008). Nesting software improves the arrangement of shapes that are already fixed. Zero-waste design changes the shapes. ElShishtawy et al. (2022) compared the two traditions and observed that they seldom draw on each other. The procedure below uses the cutting room's measure so that a designer's result can be read by a production manager without translation.
3. The Proposed Procedure
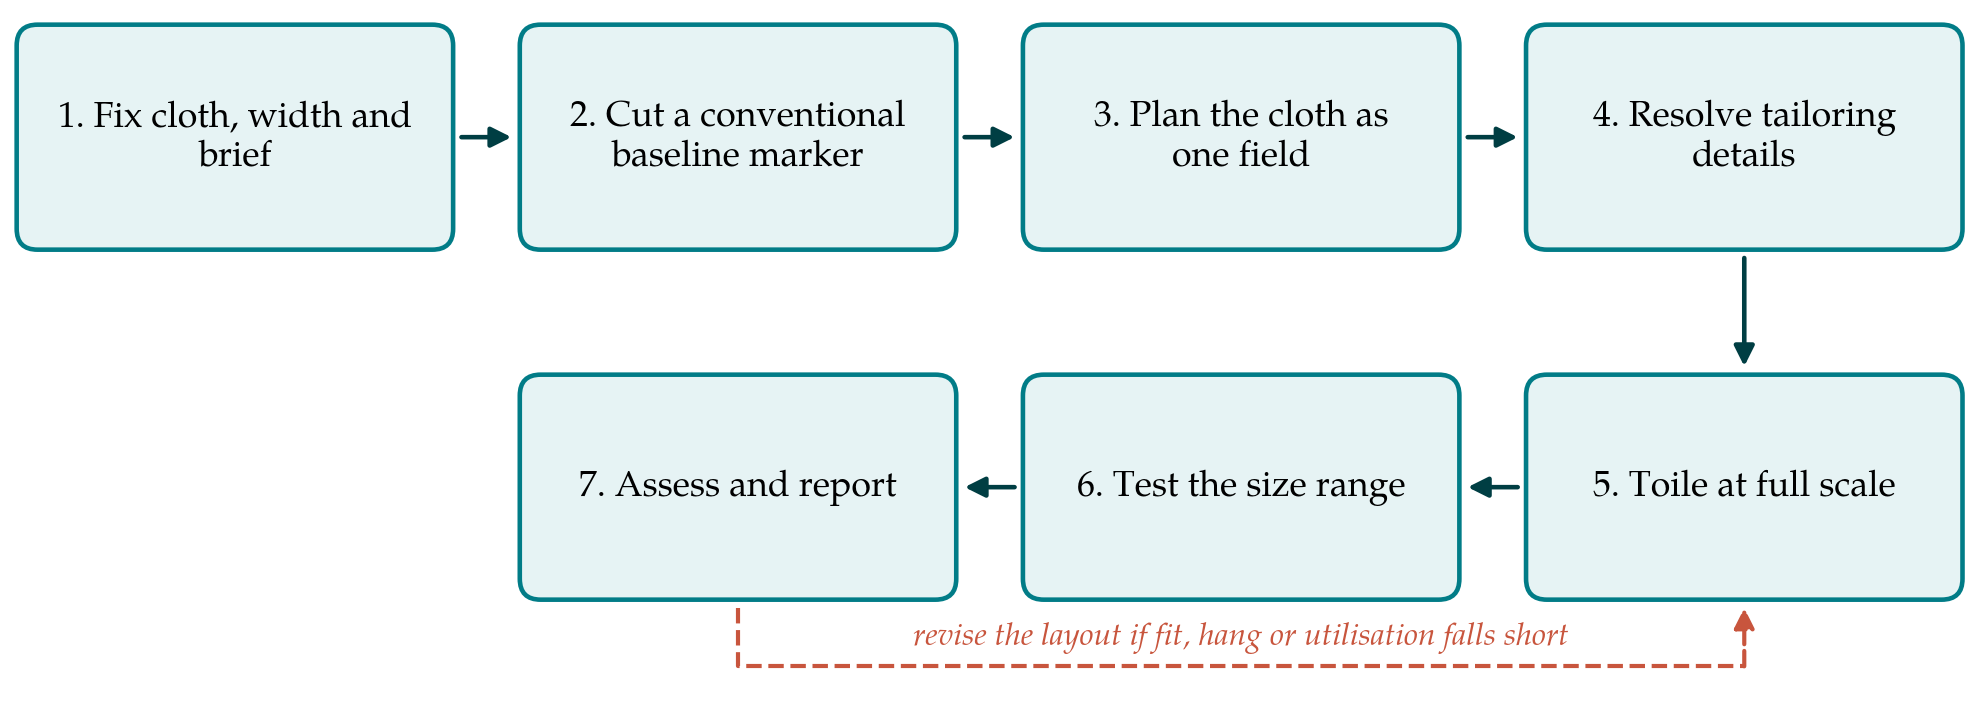
The procedure has seven steps. Table 1 sets out what is done at each and the record it should leave, and Figure 1 shows the sequence with its return loop. A single-breasted, hip-length woman's coat with a notched collar and two-piece sleeve is assumed as the working example, since it contains every feature that makes tailoring hard to cut economically.
| Step | What the designer does | Record kept |
|---|---|---|
| 1. Fix cloth and brief | Choose the cloth, measure its usable width, state style and fit requirements | Cloth specification and written brief |
| 2. Baseline marker | Cut the style conventionally and lay a marker on the same width | Marker plan, length and efficiency |
| 3. Plan the field | Place the large body and sleeve panels across the full width | Half-scale and full-scale layout drawings |
| 4. Resolve details | Form collar, facings, pockets and inlays from the remaining spaces | Annotated pattern with every area assigned |
| 5. Toile | Cut and sew the layout in a cloth of similar weight and assess it on a stand | Fit notes and photographs |
| 6. Size range | Rework the layout for the smallest and largest sizes | Layouts and utilisation by size |
| 7. Assess and report | Compare utilisation, fit and making time with the baseline | Summary sheet for both versions |
3.1. Step 1: Fix the cloth, the width and the brief
A zero-waste pattern belongs to one fabric width. The designer therefore begins by choosing the cloth and measuring the usable width inside the selvedges on the actual piece, since nominal and delivered widths differ. Nap, pattern repeat, face and reverse, and any tendency to fray are noted, because each limits how pieces may be turned. The brief then states what the coat must do: the silhouette, the amount of ease, the closure, the pockets, and which features are fixed and which may change. Writing this down first prevents the later temptation to let the layout quietly redefine the garment.
3.2. Step 2: Establish a conventional baseline
The same style is drafted from a standard block and a single-size marker is laid on the same usable width, by hand or with nesting software, following the cloth's directional rules. Its length and efficiency give the reference against which the zero-waste version will be judged. Without a baseline cut for the same cloth, size and style, any claim of saving rests on a general figure taken from the literature and cannot be checked.
3.3. Step 3: Plan the cloth as a single field
The large pieces are placed first: back, fronts and the two sleeve parts. Working at half scale on paper marked with the fabric width, the designer looks for edges that can be shared. A sleeve crown can be drawn out of the hollow of an armhole, the front edge can lie on the selvedge so that the facing is grown on and folded back, and a side panel can replace the side seam so that shaping is moved to lines that interlock. Straight hems aligned across the width let the marker end cleanly. Grain is treated as a constraint for the fronts, back and top sleeve and relaxed only where the tailoring literature already permits it, as in the under collar.
3.4. Step 4: Resolve the tailoring details
What remains between the large pieces is then assigned. In tailoring this is easier than it first appears, because a coat needs many small parts: under collar halves, collar stand, pocket flaps and welts, jettings, back neck facing, sleeve vent extensions, hanger loop and belt carriers. Areas too narrow for a part can be kept attached to a neighbouring piece as a wider inlay or hem, which adds alteration allowance and weight where a coat benefits from it. Each area on the layout is labelled with its use. An area with no function is not zero waste; it is waste that has been sewn in, and the designer should say so and count it.
3.5. Step 5: Toile at full scale
The layout is cut in a cloth of comparable weight and thickness, made up with the intended interlinings, and assessed on a dress stand and, where possible, on a fit model. The assessor checks the balance of the coat from the side, the hang of the sleeve, the roll line of the lapel, the sit of the collar at the back neck and freedom of movement across the back. Faults are traced to the layout and corrected there, which usually sends the work back to Step 3. Several rounds should be expected.
3.6. Step 6: Test the size range
Conventional grading enlarges each piece separately, and in a zero-waste layout that opens gaps or causes overlaps. The literature describes three responses: a separate layout for each size, a design whose size is adjusted by fastenings or pleats instead of by the pattern, or a mixed marker in which sizes share cloth (Rissanen and McQuillan, 2016). For a fitted coat the first is the most realistic. The procedure asks for the layout to be reworked at least for the smallest and largest sizes of the intended range, so that utilisation is reported for the range and not for a sample size alone.
3.7. Step 7: Assess and report
The two versions are compared on one sheet. Utilisation is given as marker efficiency and as fabric length consumed per coat, for shell, lining and interlining separately. Cloth retained as inlay or enlarged hem is listed apart from cloth that forms the visible garment. Fit is recorded against the written brief, and making time is noted by operation, since a pattern that saves cloth and adds an hour of handwork has moved the cost and not removed it.
4. Fitting the Procedure to Studio and Factory
In a design studio or a teaching workroom the procedure needs only paper, a half-scale stand and toile cloth, and its main demand is time for iteration. In a factory the constraints are different. Garments are cut in multi-size lays many plies deep, fabric width varies between rolls, and markers are planned to an order ratio. A zero-waste layout tied to one width and one size sits uneasily in that system, a point made repeatedly by writers who have tried to move the practice into production (Carrico and Kim, 2014; Ramkalaon and Sayem, 2021). Two adaptations are suggested. The first is to specify a minimum usable width with the mill and to design to that figure. The second is to accept a near zero-waste result and report the remainder honestly. Shell cloth is also only part of the material in a tailored coat, and the same reasoning can be applied to the lining, where fit tolerances are wider.
5. Limitations and What Remains to Be Shown
The procedure is proposed and has not been tested here. Whether it yields a coat that a tailor would accept, at a utilisation meaningfully above a well-nested conventional marker, is an open question that only cut garments can answer. A fair trial would apply the steps to several styles and cloths, have fit judged by assessors who do not know which version they are looking at, and record making time under workroom conditions. It would also follow the garments into wear, because fabric saved at the cutting table is a poor bargain if the coat is discarded sooner (Fletcher, 2008).
Two cautions follow from the measure itself. Marker efficiency rewards any use of cloth, including use that makes the garment heavier or bulkier than it needs to be, so it should always be read with the length of fabric consumed per coat. Nor does the procedure address waste that arises elsewhere, in sampling, faulty cloth or unsold stock.
6. Conclusion
Tailored outerwear is a hard test for zero-waste pattern cutting, and for that reason a useful one. The procedure set out here asks the designer to fix the cloth first, to cut a conventional baseline, to let the many small parts of a tailored coat absorb the spaces between the large ones, and to report utilisation together with fit and making time across the size range. It gives designers and production staff a shared record to argue over. Whether the coats it produces justify the effort is for practical trials to decide.
Conflict of interest
To be declared by the author(s) before publication.
Funding
To be declared by the author(s) before publication.